An external hard drive enclosure is cheaper when you order online or when you buy it at factory direct computer liquidator stores. When you buy the HDD Enclosure in retail stores like Future Shop, Best Buy, etc., the price is over 3 times and unbelievably expensive.
A typical 2.5 inch Serial ATA (SATA) hard drive enclosure package includes the Aluminum Case, USB 2.0 Y-cable, User's manual, Installation screws, Carrying pouch, and a Screwdriver. The Aluminum material casing ensures protection from vibration and overheating. USB 2.0 technology supports fast transfer speeds of up to 480 Mbps. For Windows XP systems and higher, no driver installation is required and Plug n Play feature is applicable. This device is Hot-swappable which means a Plug & Play without rebooting or restarting your computer machine. The USB Y-Cable ensures support of USB 1.1 and the second cable is for drawing additional power from the computer in case it is needed by the hard drive. The User's manual includes installation instructions illustrated with photos and pictures step by step easy to follow procedure. The compact design of the enclosure makes it easy to carry with you in your pocket or bag with the included carrying pouch providing extra protection and convenience. The installation screws and screwdriver makes you insert and install the laptop hard drive into the external enclosure a breeze.
After you successfully insert and install the old hard drive (from the old dead laptop) into the external hard drive enclosure, it should provide you a portable, convenient, lightweight, fast and high performance, handy and efficient storage for your multimedia files such as music, photos, videos, and other essential files and data.
Below, I will discuss the simple to follow instructions and step by step procedure of How to insert and install a laptop hard drive in a 2.5 inch USB SATA hard drive enclosure. Also, photos and pictures provided should benefit the reader making an easy to understand guide and a relaxing, painless learning process:
1. Before starting, touch a metal surface to get rid of static in your hands.
2. Pull the connector out of the HDD enclosure.
3. Carefully insert the power and data connectors to the hard drive.
4. Slowly insert the Laptop hard drive into the HDD external enclosure making sure that the vibration pads are positioned at the bottom.
5. Mount the two screws to secure the connector.
6. Plug the smaller end of the USB Cable to the hard drive.
7. Plug the other end of the USB Cable to the USB Port in your computer. Notice that it should light up when connected.
After connecting your hard drive with the installed enclosure to your computer, it is now time to check for the data files and folders inside it. When you try to explore and browse the contents of the hard drive, you may NOT see and view the files right away and may see a message "This folder is not accessible" or "Access is denied" or similar messages, if this happens, then click this link below to remedy and solve the problem.
How to take ownership, control, and have access to a file or folder(s) from an old hard drive
http://computers-electronics-info.blogspot.ca/2012/12/how-to-take-ownership-control-and-have.html
PICTURES:

01. Touch a metal object or surface to drain the static out of your hands.
02. A typical 2.5 inch SATA External Hard Drive enclosure package.
03. Pull out the connector.
04. Take out the connector carefully.
05. Insert the power and data connectors to the hard drive.
06. The connector fully inserted.
07. Insert the hard drive into the enclosure - black vibration pads to the bottom.
07a. Tighten loose and protruding screws if there are.
08. Use a screw driver to help you insert in tight areas.
09. The 2.5 inch laptop hard drive fully inserted into the external enclosure.
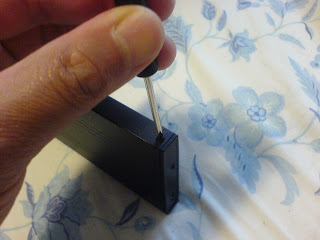
10. Using the screwdriver provided, mount and tighten the two screws on the side of the enclosure.
11. Plug the smaller end of the USB Cable to the hard drive.
12. Smaller end of the USB cable connected to the hard drive.
13. Insert the bigger end of the USB Cable to the USB Port of your computer.
14. The hard drive connected to the USB port of the computer.


Found very cool and unique info here in this blog. This is a great addition in my favorite blog list.
ReplyDeleteAcer - Refurbished - ICONIA TAB 8 GB Tablet - Refurbished - 7" - NVIDIA Tegra 2 250 1 GHz - Blue
Acer - 13.3" TravelMate Notebook - 4 GB Memory - 500 GB Hard Drive